Meal prep for medical students is more than a convenience; it’s a necessity for maintaining health amidst a demanding academic schedule. This guide provides easy, nutritious recipes and essential tips to seamlessly integrate meal planning into your hectic life.

Things You’ll Need: Meal Prep for Medical Students
Before you start, here are some essential tools and ingredients you’ll need for meal prepping:
- A set of durable, microwave-safe containers
- Measuring cups and spoons
- A good quality knife and chopping board
- Basic cooking utensils (spatula, mixing bowls, etc.)
- A variety of spices and herbs
- Staple ingredients like rice, pasta, beans, and vegetables
- Protein sources such as chicken, fish, tofu, or legumes
Meal Prep Tips for Medical Students
Before diving into specific recipes, we have some meal prep tips for you….
1. Plan Your Meals
The cornerstone of effective meal prepping is planning. Begin by outlining your meals for the upcoming week. Think about your schedule, energy needs, and nutritional balance. Include breakfasts, lunches, dinners, and even snacks.
This not only streamlines your grocery shopping but also alleviates daily decision-making about what to eat. Planning in advance ensures you’re not resorting to less healthy options in a pinch.
2. Shop Smart
With your meal plan in hand, create a detailed shopping list. This approach not only saves time at the grocery store but also helps manage your budget effectively.
By sticking to your list, you avoid impulse buys and unnecessary purchases. Remember to consider shelf-life and storage options for your ingredients, selecting fresh produce and staples that will last through the week.
3. Batch Cooking
One of the most time-efficient strategies in meal prep is batch cooking. Set aside a few hours to cook larger quantities of meals that can be portioned and stored. This might include making a big pot of chili, roasting several chicken breasts, or preparing a large salad.
Batch cooking ensures you have a consistent supply of ready-to-eat meals, saving you precious time on busy days.
4. Balanced Meals
As a medical student, your body needs proper fuel. Focus on creating meals that offer a balanced mix of macronutrients: proteins, carbohydrates, and healthy fats, along with essential vitamins and minerals. Incorporate a variety of protein sources like lean meats, fish, tofu, or beans.
Combine these with complex carbs such as whole grains and add a colorful array of vegetables for fiber and nutrients.
5. Time Management
Select a specific day and time each week for meal prepping, preferably when you have a few uninterrupted hours. Many find a weekend afternoon ideal, but choose a time that aligns with your schedule and energy levels.
Consistently dedicating this time to meal prep can become a rewarding routine, giving you more control over your diet and schedule during the week.
6. Labeling
After preparing and portioning your meals, label each container with the date of preparation. This practice is not only crucial for food safety but also helps you rotate meals efficiently, ensuring you consume the freshest meals first.
You can also include a brief description of the meal for ease of selection, especially on days when you’re in a hurry.
Meal Prep for Medical Students: 13 Easy and Delicious Recipes
Below are 13 easy meal prep recipes for medical students…
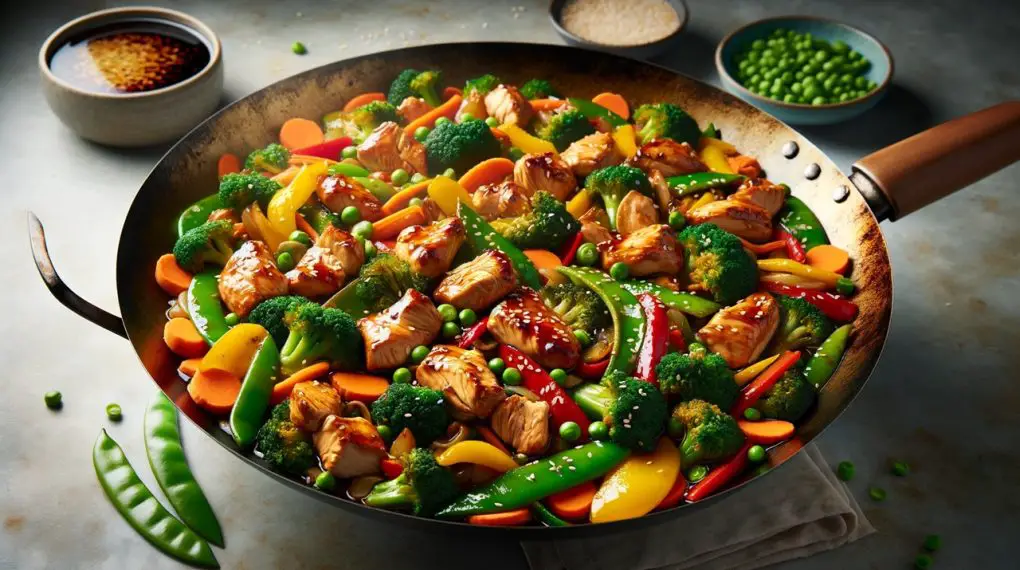
Recipe 1: Hearty Chicken and Vegetable Stir-Fry
Things You’ll Need
- 3 cups of diced chicken breast
- 2 cups of broccoli florets
- 1 cup of sliced carrots
- 1 bell pepper, sliced
- 2 tablespoons of olive oil
- 2 cloves of garlic, minced
- 3 tablespoons of soy sauce
- 1 tablespoon of honey
- Salt and pepper to taste
Preparation Steps
Follow the steps below to prepare a chicken and vegetable stir-fry…
Marinate Chicken: In a bowl, combine the diced chicken with soy sauce, honey, salt, and pepper. Mix well so each piece is coated, then let it marinate for 15 minutes. This process infuses the chicken with flavors and a touch of sweetness from the honey.
Cook Chicken: Heat olive oil in a large pan over medium heat. Once hot, add the marinated chicken. Cook it until it’s golden brown and cooked through. This usually takes about 5-7 minutes depending on the size of the chicken pieces. Ensure the chicken is spread out in the pan to cook evenly.
Add Vegetables: To the same pan, add the minced garlic first and sauté for a minute to release its aroma. Then add the broccoli, carrots, and sliced bell pepper.
Stir-fry these with the chicken, mixing frequently. The goal is to cook the vegetables until they are tender but still have a bit of crunch, which should take around 5 minutes.
Serve: Once cooked, divide the stir-fry into containers. This dish pairs wonderfully with rice or noodles, making a complete meal. If meal prepping, you can prepare your choice of side in advance as well.
Storage and Serving Size:
Fridge: Can be stored in the refrigerator for up to 4 days.
Freezer: This meal can be frozen for up to 2 months. To reheat, simply thaw in the fridge overnight and then microwave until hot.
Servings: This recipe makes 6 servings, perfect for several days of meals.
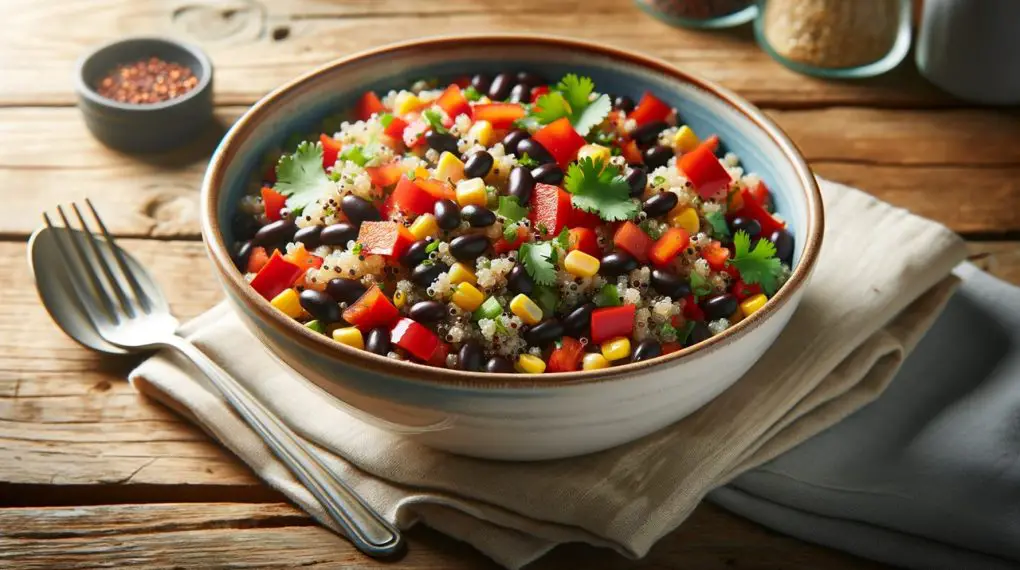
Recipe 2: Quinoa and Black Bean Salad
Things You’ll Need
- 2 cups quinoa
- 4 cups water
- 1 can black beans, drained and rinsed
- 1 cup corn kernels
- 1 red bell pepper, diced
- 1/4 cup fresh cilantro, chopped
- 1/4 cup lime juice
- 2 tablespoons olive oil
- Salt and pepper to taste
Preparation Steps
Follow the steps below to prepare a quinoa and black bean salad…
Cook Quinoa: Start by rinsing the quinoa under cold water to remove any saponins (the bitter coating). In a pot, combine the rinsed quinoa with water. Bring it to a boil, then reduce the heat, cover, and let it simmer for about 15 minutes or until all the water is absorbed and the quinoa is fluffy.
Mix Ingredients: In a large bowl, add the cooked and slightly cooled quinoa, drained and rinsed black beans, corn kernels, and diced red bell pepper. Gently toss these ingredients together.
Dressing: In a small bowl, whisk together lime juice, olive oil, salt, and pepper. This simple dressing will add a zesty and fresh flavor to the salad.
Combine and Chill: Pour the dressing over the quinoa mixture and mix well to ensure everything is evenly coated. For the best flavor, refrigerate the salad for at least an hour before serving. This allows the flavors to meld together beautifully.
Storage and Serving Size:
Fridge: This salad can be stored in the refrigerator for up to 5 days. It’s great for meal prep as the flavors develop more over time.
Freezer: Freezing is not recommended for this salad as it can affect the texture of the ingredients.
Servings: Makes 6 servings, ideal for a week’s worth of lunches or dinners.
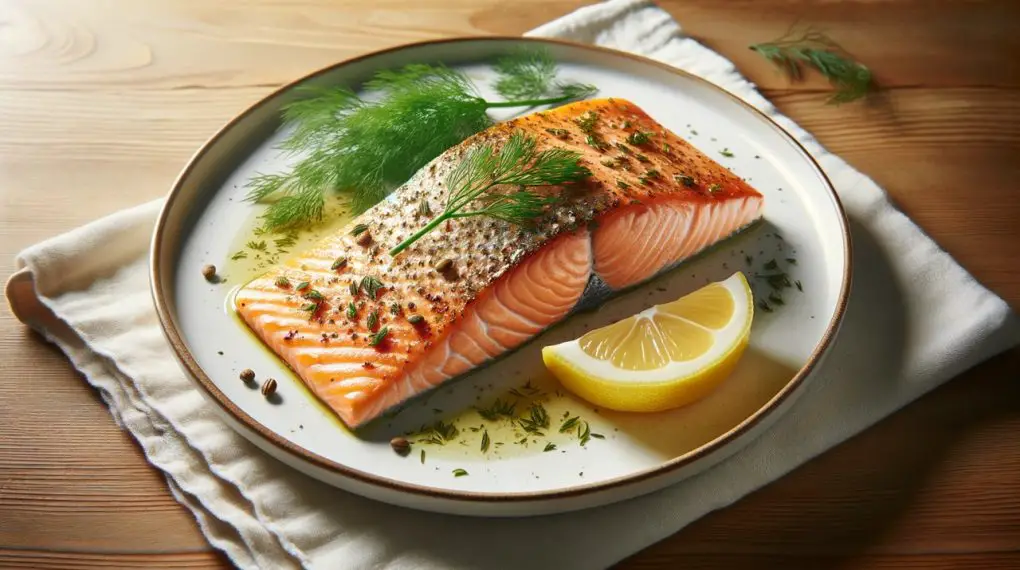
Recipe 3: Lemon Garlic Baked Salmon
Things You’ll Need
- 6 salmon fillets (approx. 6 oz each)
- 2 lemons, thinly sliced
- 4 garlic cloves, minced
- 2 tablespoons olive oil
- Salt and pepper to taste
- Fresh dill for garnish
Preparation Steps
Follow the steps below to prepare lemon garlic baked salmon…
Preheat Oven: Set your oven to 375°F (190°C) to ensure it’s at the right temperature when you’re ready to bake.
Prepare Salmon: Lay the salmon fillets on a baking tray lined with parchment paper for easy cleanup. Season each fillet generously with salt and pepper. Then evenly distribute the minced garlic over the fillets, pressing slightly to adhere.
Add Lemon and Oil: Place thin lemon slices atop each salmon fillet, covering them as much as possible. This not only adds flavor but also keeps the salmon moist while baking. Drizzle each fillet with olive oil for an extra layer of flavor and to help the surface crisp up slightly in the oven.
Bake: Place the tray in the preheated oven and bake for 20-25 minutes. The cooking time might vary slightly based on the thickness of the fillets. The salmon is done when it flakes easily with a fork and reaches an internal temperature of 145°F (63°C).
Garnish: Once baked, transfer the salmon to serving plates or a platter and garnish with fresh dill. The dill not only adds a fresh taste but also enhances the presentation.
Storage and Serving Size:
Fridge: Store any leftovers in the refrigerator for up to 3 days in an airtight container.
Freezer: You can freeze the cooked salmon for up to 2 months. Thaw in the refrigerator before reheating.
Servings: This recipe makes 6 servings, perfect for a week of planned meals.
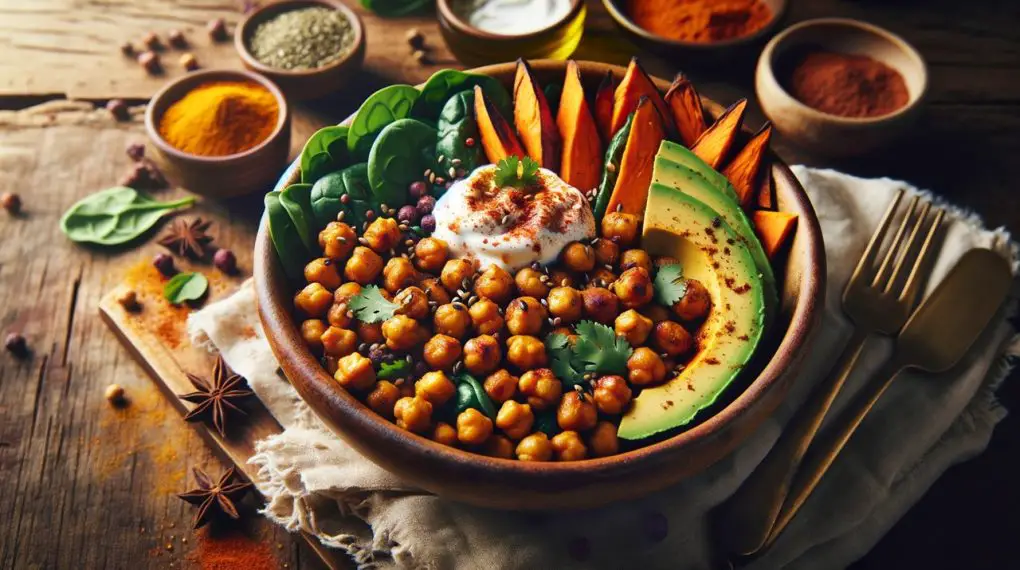
Recipe 4: Spiced Chickpea and Sweet Potato Bowl
Things You’ll Need
- 3 cups sweet potatoes, cubed
- 2 cans chickpeas, drained and rinsed
- 2 tablespoons olive oil
- 1 teaspoon paprika
- 1 teaspoon cumin
- Salt and pepper to taste
- 6 cups spinach leaves
- 1/4 cup tahini
- 2 tablespoons lemon juice
Preparation Steps
Follow the steps below to prepare a spiced chickpea and sweet potato bowl…
Roast Sweet Potatoes and Chickpeas: Begin by preheating your oven to 400°F (200°C). In a large bowl, toss the sweet potatoes and chickpeas with olive oil, paprika, cumin, salt, and pepper.
Spread them out on a baking sheet in a single layer to ensure even cooking. Roast in the preheated oven for 25-30 minutes, or until the sweet potatoes are tender and the chickpeas are slightly crispy.
Assemble Bowls: Take containers or bowls and fill the base with fresh spinach leaves. The spinach will serve as a bed for the warm ingredients.
Tahini Dressing: In a small bowl, whisk together the tahini and lemon juice. The dressing should be creamy and pourable. If it’s too thick, you can add a little water to reach the desired consistency.
Combine: Once the sweet potatoes and chickpeas are roasted, distribute them evenly over the spinach leaves in each container. Then drizzle the tahini dressing over each bowl. The warmth from the roasted ingredients will slightly wilt the spinach, making it more palatable.
Storage and Serving Size:
Fridge: These bowls can be stored in the refrigerator for up to 4 days. If you’re meal prepping, keep the dressing separate and add just before serving.
Freezer: It’s not recommended to freeze this dish, especially because of the spinach and dressing.
Servings: This recipe yields 6 servings, ideal for a week’s worth of nutritious lunches or dinners.
Recipe 5: Turkey and Vegetable Soup
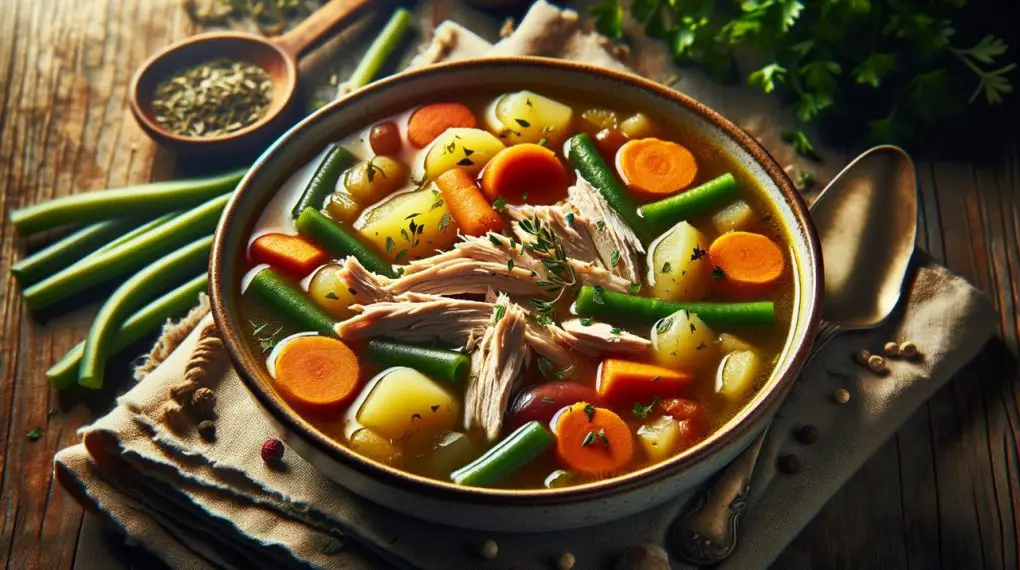
Things You’ll Need
- 2 tablespoons olive oil
- 1 onion, chopped
- 2 carrots, diced
- 2 celery stalks, diced
- 3 garlic cloves, minced
- 1 pound ground turkey
- 4 cups chicken broth
- 1 can diced tomatoes
- 1 teaspoon dried basil
- 1 teaspoon dried oregano
- Salt and pepper to taste
- 2 cups spinach leaves
Preparation Steps
Follow the steps below to prepare turkey and vegetable soup…
Sauté Vegetables: In a large pot, warm the olive oil over medium heat. Add the chopped onions, carrots, celery, and minced garlic. Sauté these ingredients until the onions become translucent and the other vegetables start to soften, infusing the base of the soup with their flavors.
Cook Turkey: Add the ground turkey to the pot. Cook it, breaking it apart with a spoon, until it’s thoroughly browned. This step not only cooks the meat but also allows it to absorb the flavors of the sautéed vegetables.
Add Broth and Tomatoes: Pour in the chicken broth and add the diced tomatoes (with their juice) to the pot. Stir in the dried basil and oregano. Season with salt and pepper according to your taste preference.
Simmer: Bring the mixture to a boil, then reduce the heat and let the soup simmer uncovered for about 20 minutes. This allows the flavors to meld together and the vegetables to become fully tender.
Add Spinach: Just before you’re ready to serve, stir in the spinach leaves and cook until they’re wilted, which should take just a couple of minutes. The spinach adds a fresh, leafy component to the soup, enhancing its nutritional value.
Storage and Serving Size:
Fridge: This soup can be stored in the refrigerator for up to 5 days.
Freezer: It freezes well for up to 3 months. Thaw and reheat for a quick meal.
Servings: Makes 6 hearty servings, perfect for a week of meal prep.
Recipe 6: Veggie-Packed Pasta Salad
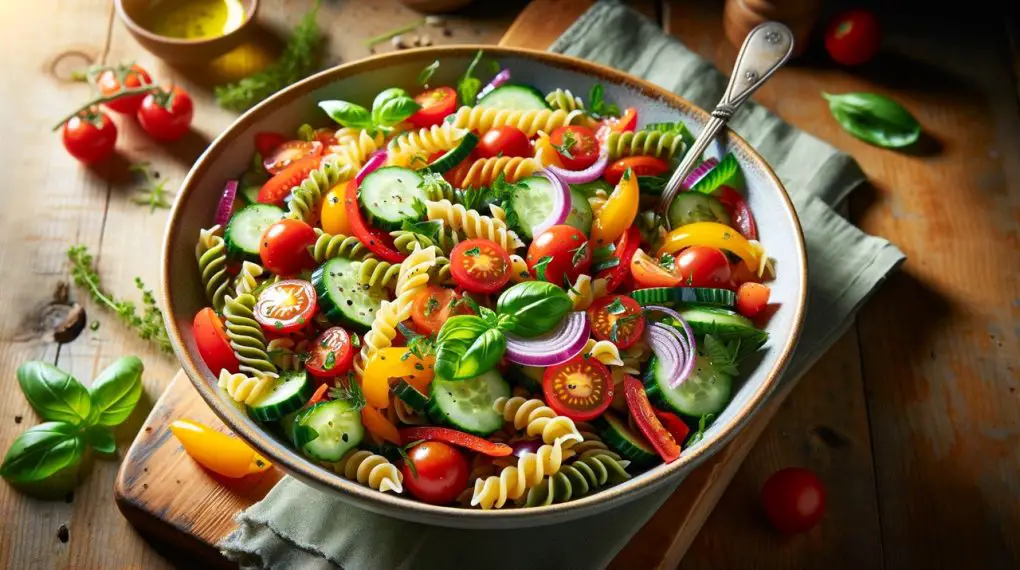
Things You’ll Need
- 1 box whole wheat pasta
- 1 cucumber, diced
- 1 cup cherry tomatoes, halved
- 1/2 cup red onion, finely chopped
- 1/2 cup black olives, sliced
- 1/4 cup feta cheese, crumbled
- 1/4 cup olive oil
- 3 tablespoons red wine vinegar
- 1 teaspoon dried oregano
- Salt and pepper to taste
Preparation Steps
Follow the steps below to prepare a veggie pasta salad…
Cook Pasta: Cook the whole wheat pasta as per the package instructions until it’s al dente. Drain it and then let it cool to room temperature. This prevents the pasta from becoming too soft when mixed with the dressing.
Combine Ingredients: In a large bowl, add the cooled pasta, diced cucumber, halved cherry tomatoes, finely chopped red onion, and sliced black olives. These fresh vegetables provide a variety of textures and flavors that complement the pasta well.
Add Dressing: Whisk together olive oil, red wine vinegar, oregano, salt, and pepper in a small bowl. This dressing is simple yet full of flavor, tying all the salad components together.
Combine and Serve: Pour the dressing over the pasta and vegetables, tossing everything to ensure it’s well coated. Finally, sprinkle the crumbled feta cheese over the salad. The feta adds a creamy texture and a salty tang that elevates the salad.
Storage and Serving Size:
Fridge: Can be stored in an airtight container in the refrigerator for up to 5 days.
Freezer: Freezing is not recommended as it can affect the texture of the pasta and vegetables.
Servings: Makes 6 servings, perfect for a week of lunches or as a side dish.
Read more meal prep topics here – Meal Prep for Every Situation: Your Ultimate Guide
Recipe 7: Tofu Stir-Fry with Brown Rice
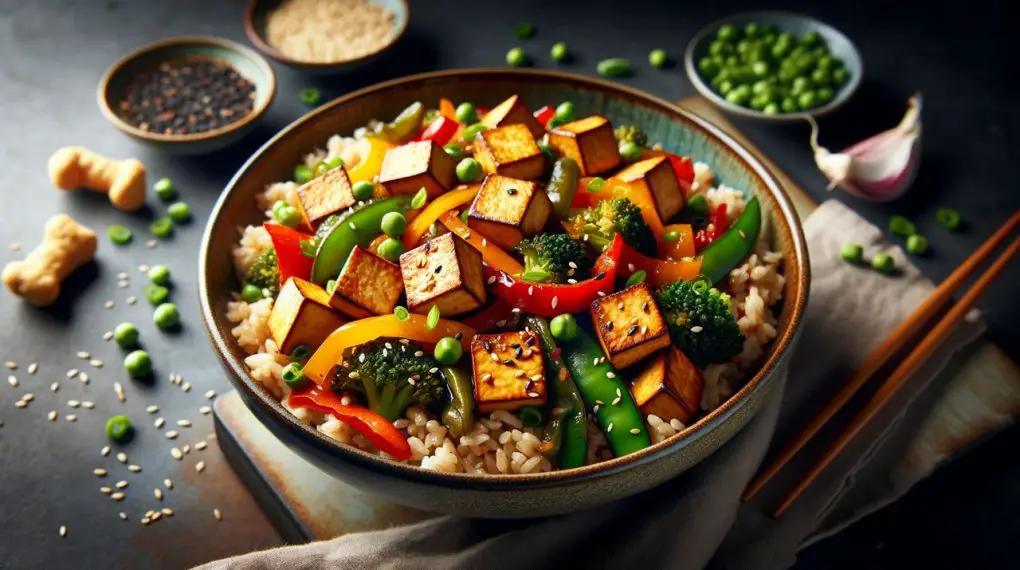
Things You’ll Need
- 2 cups brown rice
- 4 cups water
- 1 block firm tofu, cubed
- 2 tablespoons soy sauce
- 1 tablespoon sesame oil
- 1 red bell pepper, sliced
- 1 cup snap peas
- 1 carrot, sliced
- 2 tablespoons vegetable oil
- 1 tablespoon ginger, minced
- 2 garlic cloves, minced
Preparation Steps
Follow the steps below to prepare tofu stir-fry with brown rice…
Cook Rice: Start by cooking the brown rice. Rinse it first, then cook in water according to package instructions, usually about 45 minutes. Brown rice is a healthy base for the stir-fry, providing sustained energy.
Prepare Tofu: Cut the tofu into even cubes and marinate in a mixture of soy sauce and sesame oil. Let it sit for at least 15 minutes to absorb the flavors. This step is key to giving the tofu a rich taste.
Cook Vegetables: In a large skillet or wok, heat the vegetable oil over medium-high heat. Add the sliced red bell pepper, snap peas, and carrot. Stir-fry until the vegetables are tender but still crisp, about 5-7 minutes.
Add Tofu and Seasonings: Add the marinated tofu to the skillet along with the minced ginger and garlic. Stir-fry until the tofu is golden brown on the edges, infusing the dish with its savory flavor.
Serve with Rice: Serve the tofu and vegetable stir-fry over a bed of warm brown rice. This creates a wholesome, satisfying meal that’s both nutritious and flavorful.
Storage and Serving Size:
Fridge: Store in the refrigerator for up to 4 days.
Freezer: Can be frozen for up to 2 months. Thaw and reheat for a quick meal.
Servings: Makes 6 servings, perfect for meal prep or family dinners.
Recipe 8: Baked Chicken and Vegetables
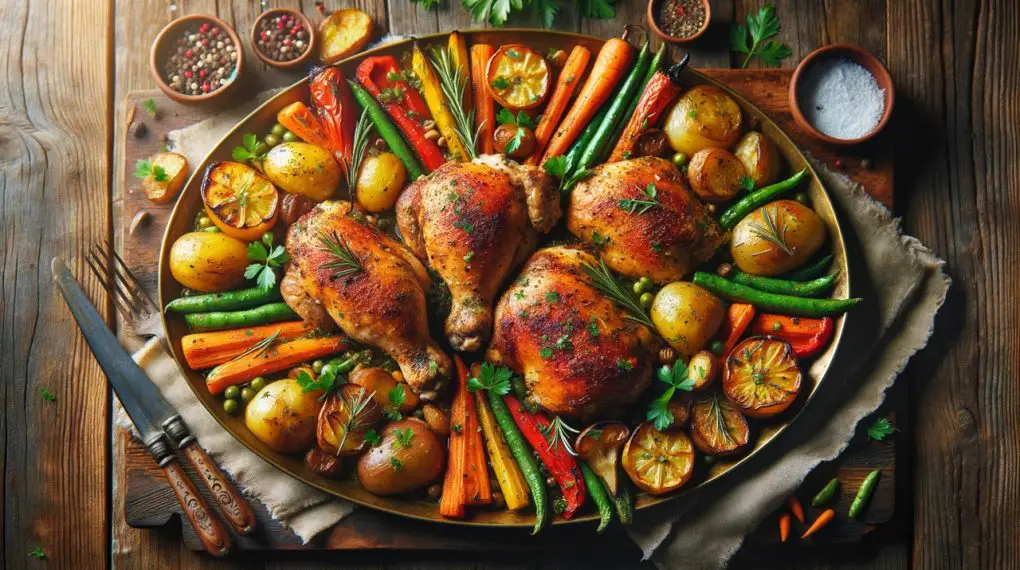
Things You’ll Need
- 6 chicken thighs, bone-in and skin-on
- 2 sweet potatoes, cubed
- 1 red onion, chopped
- 2 zucchinis, sliced
- 2 tablespoons olive oil
- 1 teaspoon paprika
- Salt and pepper to taste
- Fresh rosemary for garnish
Preparation Steps
Follow the steps below to prepare baked chicken and vegetables…
Preheat Oven: Heat your oven to 400°F (200°C), ensuring it’s ready for immediate baking.
Season Chicken: Season the chicken thighs with paprika, salt, and pepper. This not only flavors the chicken but also helps in creating a deliciously crisp skin.
Prepare Vegetables: In a separate bowl, toss the cubed sweet potatoes, chopped red onion, and sliced zucchinis with olive oil, salt, and pepper. This ensures they’re evenly coated and seasoned.
Bake: Arrange the seasoned chicken thighs and vegetables on a baking tray. The chicken should be placed skin-side up. Bake in the preheated oven for 35-40 minutes, or until the chicken is cooked through and the vegetables are tender.
Garnish: Once done, garnish with fresh rosemary. This not only adds flavor but also a pleasant aroma and visual appeal to the dish.
Storage and Serving Size:
Fridge: Can be kept in the refrigerator for up to 4 days, ensuring you have delicious meals ready for the majority of the week.
Freezer: This dish is freezer-friendly. Store it for up to 2 months, and when you’re ready to eat, just thaw and reheat.
Servings: This recipe yields 6 servings. It’s perfect for a family dinner or several days of nutritious, ready-to-go lunches.
Recipe 9: Beef and Broccoli Stir-Fry
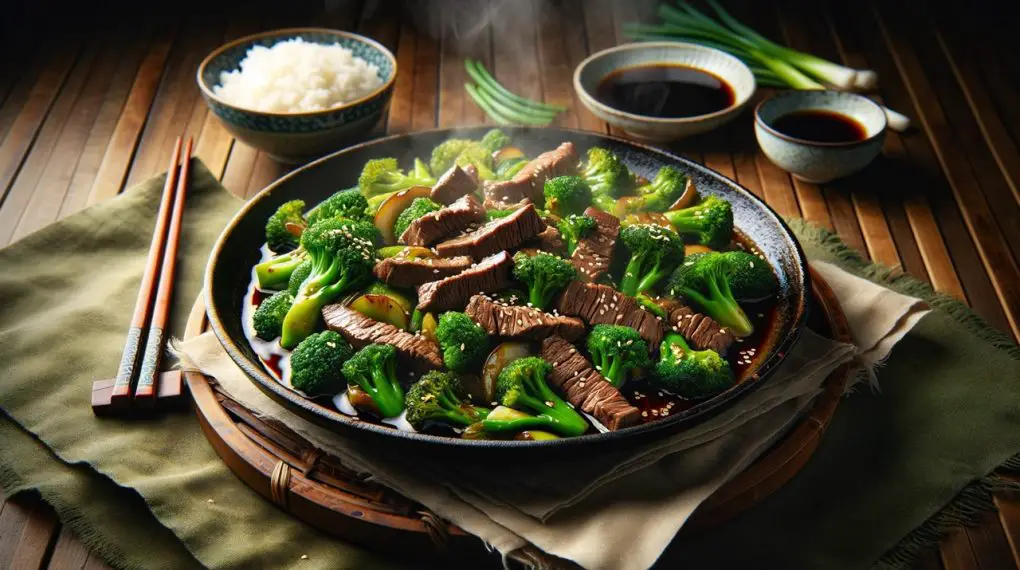
Things You’ll Need
- 1 pound beef strips
- 3 cups broccoli florets
- 2 tablespoons soy sauce
- 1 tablespoon oyster sauce
- 1 teaspoon cornstarch
- 2 tablespoons vegetable oil
- 1 garlic clove, minced
- 1 teaspoon ginger, minced
- 1/2 cup beef broth
Preparation Steps
Follow the steps below to prepare beef and broccoli stir-fry…
Marinate Beef: In a bowl, combine the beef strips with soy sauce, oyster sauce, and cornstarch. Mix well, ensuring each piece is coated. Let the beef marinate for 15 minutes, allowing the flavors to infuse and the cornstarch to tenderize the beef slightly.
Cook Broccoli: Blanch the broccoli florets in boiling water for 2 minutes. This process softens the broccoli slightly while retaining its bright green color and crunch. After blanching, immediately drain the broccoli.
Stir-Fry Beef: Heat vegetable oil in a skillet over medium-high heat. Add the marinated beef and stir-fry until it’s browned and cooked through. The high heat cooks the beef quickly, ensuring it stays tender.
Add Broccoli and Sauce: To the skillet with the beef, add the blanched broccoli, minced garlic, ginger, and beef broth. Stir everything together and cook until the sauce thickens and coats the beef and broccoli. The garlic and ginger add aromatic flavors, while the broth creates a savory sauce.
Serve: Serve this beef and broccoli stir-fry over a bed of cooked rice or noodles for a complete meal.
Storage and Serving Size:
Fridge: Store in an airtight container for up to 3 days.
Freezer: Suitable for freezing for up to 2 months. Thaw and reheat for a quick meal.
Servings: This recipe makes 6 servings, ideal for meal prep or a family dinner.
Recipe 10: Lentil and Vegetable Curry
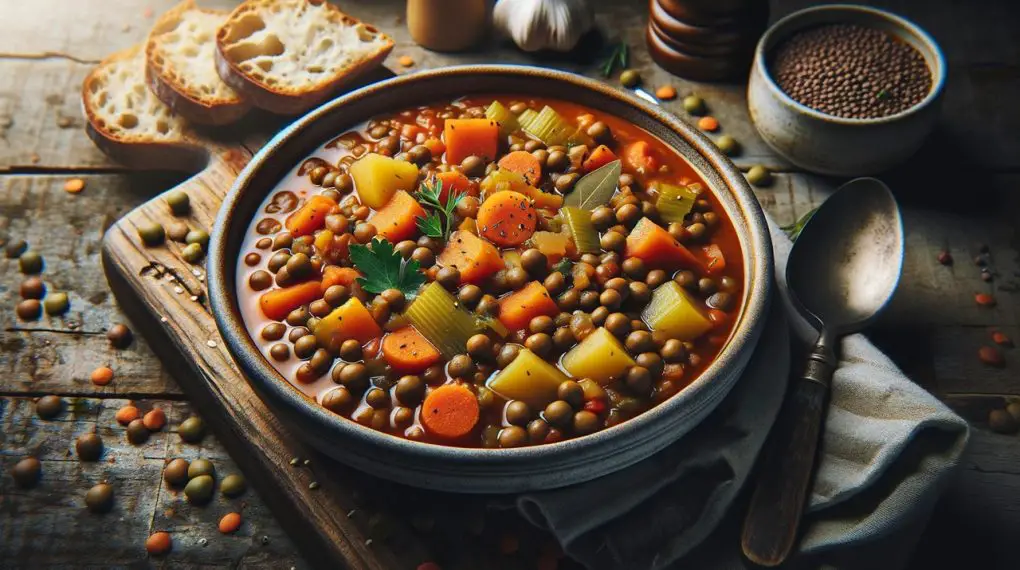
Things You’ll Need
- 1 cup lentils
- 3 cups water
- 1 onion, chopped
- 2 carrots, diced
- 1 can diced tomatoes
- 1 can coconut milk
- 2 teaspoons curry powder
- 1 teaspoon cumin
- Salt to taste
- 2 tablespoons vegetable oil
Preparation Steps
Follow the steps below to prepare a lentil and vegetable curry…
Cook Lentils: Rinse the lentils under cold water to remove any debris. Cook them in water until they are tender, which usually takes about 20 minutes. Drain any excess water.
Sauté Vegetables: In a separate pot, heat the vegetable oil over medium heat. Add the chopped onion and diced carrots. Sauté until the onions are translucent and the carrots start to soften, laying the flavor foundation for the curry.
Add Spices and Tomatoes: Stir in the curry powder and cumin, cooking for a minute to release their fragrances. Then add the diced tomatoes with their juice, letting the mixture simmer for about 5 minutes. The tomatoes break down slightly, creating a rich base for the curry.
Combine with Lentils: Add the cooked lentils to the pot with the spiced tomato mixture. Pour in the coconut milk, which adds creaminess and a subtle sweetness.
Season: Let the curry simmer for another 10 minutes, allowing the flavors to meld together. Season with salt to taste.
Storage and Serving Size:
Fridge: Can be refrigerated for up to 5 days in an airtight container.
Freezer: Freezes well for up to 3 months. Thaw and reheat for a convenient meal.
Servings: Makes 6 servings, perfect for meal prep or family meals.
Recipe 11: Baked Frittata with Vegetables

Things You’ll Need
- 8 eggs
- 1/2 cup milk
- 1 cup spinach, chopped
- 1 bell pepper, diced
- 1/2 cup cherry tomatoes, halved
- 1/2 cup feta cheese, crumbled
- Salt and pepper to taste
- 1 tablespoon olive oil
Preparation Steps
Follow the steps to prepare a veggie frittata…
Preheat Oven: Start by heating your oven to 375°F (190°C). This ensures the oven is at the correct temperature for immediate baking.
Whisk Eggs: In a large bowl, whisk together the eggs and milk. Season with salt and pepper. This mixture will form the base of your frittata, providing a creamy and fluffy texture.
Sauté Vegetables: In an oven-safe skillet, heat the olive oil. Add the chopped spinach, diced bell pepper, and halved cherry tomatoes. Sauté these for a few minutes until they are slightly softened and the spinach is wilted. The vegetables will add their flavors and textures to the frittata.
Add Eggs and Feta: Pour the whisked egg mixture over the sautéed vegetables in the skillet. Gently stir to ensure the vegetables are evenly distributed. Sprinkle the crumbled feta cheese on top. The feta will add a tangy richness to the dish.
Bake: Place the skillet in the preheated oven and bake for 20-25 minutes. The frittata is done when it’s set and lightly golden on top. Baking allows the eggs to puff up and the flavors to meld together.
Storage and Serving Size:
Fridge: Store the frittata in the refrigerator for up to 4 days. It’s a great make-ahead breakfast or brunch option.
Freezer: Can be frozen for up to 1 month. Slice and wrap individual portions for easy reheating.
Servings: This recipe makes 6 servings, ideal for feeding a family or meal prepping.
Recipe 12: Greek Yogurt and Berry Parfait

Things You’ll Need
- 4 cups Greek yogurt
- 2 cups mixed berries (strawberries, blueberries, raspberries)
- 1/4 cup honey
- 1 cup granola
Preparation Steps
Follow the steps below to prepare a Greek yoghurt and berry parfait…
Layer Parfait: Begin assembling your parfaits by spooning a layer of Greek yogurt into individual containers or glasses. Follow with a layer of mixed berries. Drizzle a bit of honey over the berries for added sweetness.
Top with Granola: Just before serving, add a generous layer of granola on top of each parfait. This ensures the granola stays crunchy and adds a pleasing texture contrast to the creamy yogurt and soft berries.
Storage and Serving Size:
Fridge: Assembled parfaits (without the granola) can be stored in the refrigerator for up to 3 days. Add the granola right before serving to maintain its crunch.
Freezer: Freezing is not recommended as it can alter the texture of the yogurt and berries.
Servings: Makes 6 servings, perfect for a week of healthy, delicious breakfasts or snacks.
Recipe 13: Vegetable and Bean Chili
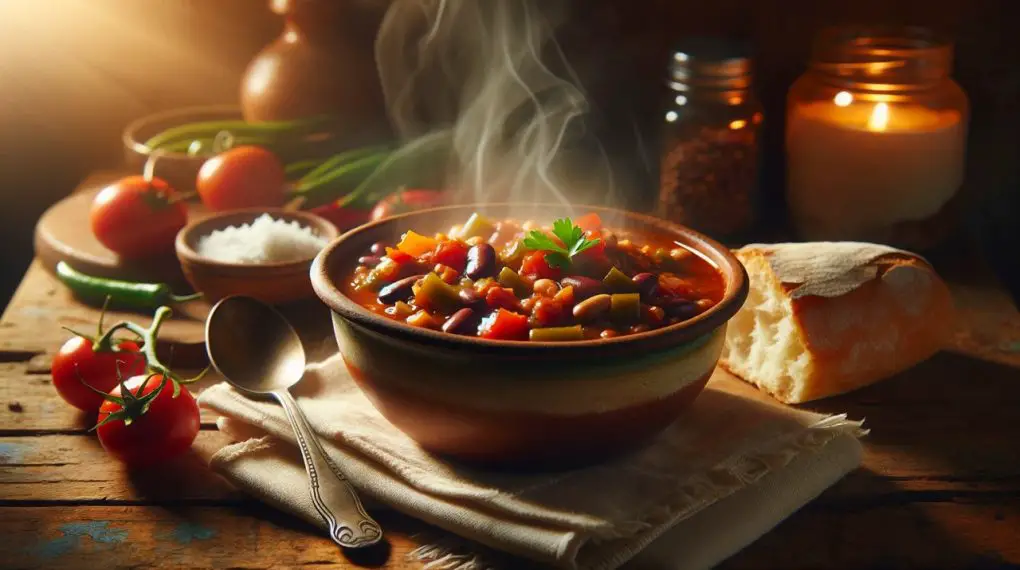
Things You’ll Need
- 2 tablespoons olive oil
- 1 onion, chopped
- 2 bell peppers, diced
- 2 garlic cloves, minced
- 1 can kidney beans, drained and rinsed
- 1 can black beans, drained and rinsed
- 1 can diced tomatoes
- 2 tablespoons chili powder
- 1 teaspoon cumin
- Salt and pepper to taste
- 1 cup corn kernels
Preparation Steps
Follow the steps below to prepare a vegetable and bean chili…
Sauté Vegetables: In a large pot, heat the olive oil over medium heat. Add the chopped onions, diced bell peppers, and minced garlic.
Sauté these ingredients until the onions are translucent and the peppers have softened. This process helps to release the natural sugars and flavors of the vegetables, forming a flavorful base for the chili.
Add Beans and Tomatoes: Next, add the drained and rinsed kidney beans and black beans to the pot. Also, pour in the can of diced tomatoes, including their juice, to add body to the chili.
Season the mixture with chili powder and cumin, stirring well. These spices are key to giving the chili its distinctive warm and smoky flavor. Adjust with salt and pepper to your taste.
Simmer: Bring the chili to a boil, then reduce the heat to a simmer. Let it cook uncovered for about 30 minutes, stirring occasionally. This slow cooking allows the flavors to meld together and the beans to become tender, creating a rich and hearty chili.
Add Corn: Stir in the corn kernels during the last 5 minutes of cooking. The corn adds a mild sweetness and a different texture, enhancing the overall dish.
Serve: Serve the chili hot. It can be garnished with cheese, sour cream, or chopped green onions, depending on your preference. These toppings add creaminess and a fresh burst of flavor.
Storage and Serving Size:
Fridge: The chili can be stored in the refrigerator for up to 5 days, making it an excellent option for meal prep.
Freezer: It freezes well for up to 3 months. Portion it out and freeze in airtight containers for easy reheating.
Servings: This recipe yields 6 servings, perfect for a family meal or multiple individual meals.
With these recipes, you have a variety of nutritious and easy-to-prepare meals at your disposal, perfect for the demanding schedule of a medical student. Each recipe is designed to provide a balance of nutrients, flavor, and simplicity, helping you to maintain a healthy diet even on your busiest days.
Conclusion: Meal Prep for Medical Students
As a medical student, your schedule is demanding, but that doesn’t mean your diet has to suffer. With these meal prep tips and recipes, you’re equipped to prepare healthy, delicious meals that will keep you energized and focused throughout your studies.
